Wednesday, June 12, 2019

A complete guide to Cocoa farming in Uganda

How to grow COCOA in Uganda

All chocolate begins with cocoa beans, the fruit of a perennial cocoa tree. 

Scientist say the tree originated somewhere in south or Central America. 
Some say the first trees grew in the Amazon basin of Brazil while others place its origin in the Orinoco valley of Venezuela. 
Wherever it’s first home, we know the cocoa tree is strictly a tropical plant thriving only in hot, rainy climates. 
This places Africa as a main home for cocoa growth. 
Cocoa can only be cultivated within 20 degrees north and south of the equator.
Image result for cocoa garden

Common Cocoa varieties in Africa

There are two main species of cocoa, criollo and forastero
Criollo is sometimes called the price of cocoas as it’s a very high quality grade of cocoa with exceptional flavor and aroma. 
A third type of cocoa is Trinitario hybrid or across between the main species.

 How to Propagate Cocoa in Uganda

Cocoa is propagated both by seed and by cuttings. 
Seeds are planted at stake where 3 seeds are planted per hole and later thinned to one. 
Germination often is complete within 15 days of seed planting. 
Alternatively cuttings can be obtained from young vigorous healthy trees in the mother garden. 
These should be cut at a right angle usually above anode 5-12 inch along with 3-9 leaves. 
Remove the bottom leaves and dip the base in a rooting hormone.

How to Plant Cocoa  

Traditionally cocoa grows under a shade, such as natural shades provided by other trees. 
So in preparation of the land for planting you should pick land which will protect the cocoa from direct sun light and winds.
The size of the hole should be at least 2ft X 2ft
The hole must be slightly bigger than this. And the soil must be separated. The dark soil on one side the red soils on the other side. Always use the dark soil to refill the hole first during planting
Transplant of the seedlings when steady rains set in before the dry season. 
A spacing of 3mx3m should be used which gives a plantation of 1000 trees per hectare.

REPLACING MISSING SEEDLINGS

Sometimes certain cocoa seedlings do not grow well. They remain small or die.
During the months following the day when you planted your seedlings, you must always look to see whether the cocoa trees are growing well.
If you see diseased or dead cocoa trees, pull them out and burn them, and also those encircling them in case of swollen shoot disease . In their place, plant other young cocoa seedlings, from among those that you have kept in the nursery bed or in baskets.

Crops that can be intercropped with Cocoa
When cocoa has just been planted, it provides enough space that make it convenient for other crops to grown as well. Cocoa like any other tree plant, requires a lot of nitrogen for vegetative growth. It is therefore advisable that intercropping cocoa with legumes is a well thought idea. The legumes are known to be excellent nitrogen fixers which makes cocoa growth and establishment vigorous.
On a commercial basis and profitability, it is commercially wise to intercrop the plant with banana for the following reasons.
Remember, our primary goal for intercropping cocoa is ti increase profitability. Nothing more


    Image result for cocoa garden with bananas
    Young cocoa trees intercropped with mature banana plants. Such a practice is good more especially if cocoa is your primary target crop and your using bananas as  shade crops
  • The fact that bananas start producing in not more than a year, they will be in position to provide food to the farmer and if sold to the markets, they provide capital which can be used to manage the cocoa plants through be able to pay for laborers, buy fertilizers and manure where necessary . By this, the farmer does not feel the burden of rising the funds to look after the plantation from other sources
  • The bananas provide shade to cocoa as it grows. Cocoa like coffee, highly need shade especially when still young and during the maturity period when they have started fruiting. If not provided with shade during those stages, the chances of reaching economic loss if high. It is therefore advisable that you intercrop your cocoa field with some bananas to provide shade.

Apart from legumes and banana, you can do what we can enterprise mix, where legumes, banana and cocoa can be on the same piece of land but you have to be mindful of the spacing for the banana as this time, it increases from 3M to 6M. This increases the intensity of light received by the legumes and also provides a better atmosphere in your field.
Image result for cocoa intercropping with banana and coffee
Cocoa plants intercropped with coffee and bananas

The same enterprise mix can be done where you can decide to mix cocoa, banana and coffee. However, when you do this mix, you need to determine which of the three ( cocoa, banana and coffee) do you take as your primary enterprise. If for example it is cocoa for this matter, the the spacing for the other two has to be double to provide enough growing space to the cocoa plant.
Remember, cocoa, banana and coffee need the same spacing (10ftX10ft) and this translates to 450 plants of each in an acre and about 1000 in an hectare. But the fact that we primarily want cocoa as our major crop, then we have to increase the spacing for the other two to 20ft x 20ft. This means we shall half the amount of each ( 225). Coation has to be taken not to make your plantation a mess by over populating these three crops in the name of enterprise mix.
Do not worry about this, if you fill you have not understood it where, please contact us, we will be able to guide you
Related image
How to Weed Cocoa in Uganda
Weeding cocoa field is as easy as weeding any other plant. However, the tools to be used during cocoa weeding are highly determined by the level of maturity of your cocoa field

  1. For young field that are not more one year, our ordinary hand hoes can be used. Because at this time, the root network is not well established and pronounced. But even then, avoid digging around the plant to avoid damaging the cocoa roots.
  1. For a mature plantation, use of hand hoes must be totally avoided. At this level, we all know the roots have fully established and if they are damaged in any way, then plant growth will be retarded and this affects the yield and most particularly the pod size reduce.
  1. Weed 3 to 4 times a year. This should be done by ring weeding around the cocoa trees and slashing along the rows of the cocoa trees. This should be done using forked hoes to avoid damaging the roots
Application of manure and fertilizers


Cocoa like any other coffee and bananas is a heavy feeder crop. This literally mean that it requires a lot of nutrient.Application of nutrients depending on the stage and level of growth of the cocoa plant. This is so because the rate of nutrient requirement depends on the stage of the plant growth. And the only way to do this is through addition of nutrients through manure and fertilizer application. The major nutrients elements required are Phosphorus during planting - for root establishment. This is obtained by addition of organic manure during planting at a ratio of 1:2. And in case of inadequate manure, fertilizers can also provide the necessary nutrient. Let us look at it in this angle

  1. During planting, the cocoa plant needs a lot of phosphorus (P) and this can be obtained through use of organic manure as we saw earlier on. At this stage, we are only looking at how best the cocoa plant will establish quickly given the dynamics in the growth conditions. The application of manure therefore provides the necessary nutrients need for crop establishment. Organic manure is believed to the only form of nutrient source that provide almost all the required growth elements to plants.The only limiting factor is that it is hard to get enough for the entire plantation. This is where farmers are advised to complement the application through the inorganic fertilizers. However, caution must be taken on what to buy at what stage. We shall have a detailed analysis of fertilizer usage and rates at a later date but let us get the basics for this case. Since we need a lot of P during crop establishment, you are therefore advised to buy fertilizer specific for this this element ( a phosphate fertilizer for this matter). They are many of them in the market like DAP, MOP, SSP, TSP and others but since we saw that cocoa is among the heavy feeder crops, this means that every nutrient must be provided in abundance and in this, TSP is believed to have a lot of P compared to the other (Tri Super phosphate). So during planting, apply at least a palmful of TSP to each cocoa plant. This should be mixed in the used which is replaced back into the hole during filling. Using NPK is also advisable but the percentage of P must be higher than the other two ( at least 46%P) or NPK flat 
  2. Ring fertilizer application
  3. When the plant has established, it now needs a lot of Nitrogen to encourage the attraction of more sun light and also be able to make its food.Just make a ring around the plant of about 1ft and apply the nitrogen fertilizer. CAN, urea or any other nitrogen fertilizer can be used at a rate of 250g
  4. The same can be done to the potassium fertilizer. This must be applied when our cocoa plant is just a few months to fruiting. K is a good element that encourages and enhances fruiting among the growing crops like cocoa.
  5. Please note that the rates of application of these nutrient elements increases as the plants grows. In shorts, the rates used to feed a young cocoa plant are not the same when the cocoa plants reach one or more years. The rates increase with increasing maturity of the the cocoa plant.Related image
Pruning of the cocoa plant

The cocoa tree is a tree that develops well. 
It has a single, straight trunk.

A crown of 3 to 5 main branches forms about 1.5 metres above ground level.
Sometimes, during the first year, several shoots form on the trunk.
Cut off these shoots and leave only the strongest.
Sometimes the crown forms too low down, at less than 1 metre above ground level.
Choose a shoot which grows straight up and let it develop.
A new crown will then form at a good height, and the first crown will stop growing.
Young well-grown cocoa tree

Young cocoa tree with two shootsCocoa tree which forms its crown too low down

Always cut out all dead branches, dry twigs and suckers.
sucker is a twig that grows upward out of the trunk.
Cut off the suckers very close to the trunk.
When a cocoa tree gets old, it no longer yields many pods.
But you can make cocoa trees young again by letting one or two suckers grow low down on the trunk where they can develop their own roots.
Then cut down the old trunk, and you will again have a cocoa tree that yields many pods.


Pests and diseases that affect the cocoa plant

There are various diseases and pests that attack the cocoa plant and these are listed below:
Cocoa swollen shoot
This is caused by a virus and it leads to the swelling of the shoots and leaves. It leads to defoliation of the leaves causes stem swelling and the growth of nodes on the shoots of the leaves.
It can prevented and managed by separating the cocoa plants with a 33 feet distance and the affected area should be cut off to prevent further spread of the disease to other parts.
The cocoa pod borer
This affects the cocoa by the insect larvae entering into the pods before they mature. These make it extremely difficult to separate the beans from the pods and it can be prevented by placing the pods in plastic bags to prevent the insects from laying their lava on the immature pods.
The witch’s broom
It is caused by fungi and its symptoms include branches that do not produce fruit, discolored leaves and pods which have uneven ripening and green patches.
The infected area should be cut off and discarded whereas the cocoa should be planted in a clean environment as this will reduce on the spread of disease.
The frosty pod disease
This is caused by fungi and it causes the cocoa to have spots on the pods which are brown in color and it should be noted that they mostly affect growing pods.
The application of copper and cutting down the affected area can prevent the spread of the diseases and if possible, the cocoa should be planted in the dry season.

Challenges faced in cocoa growing

The climatic change in Uganda is a bit of challenge to the farmers in the country. This can cause immature growth of the cocoa pods leading to losses on the farm.
There is also a problem of pests and diseases that attack the cocoa causing poor yields during harvesting period.
Most of the farmers are not aware of the market for cocoa and they end up selling the cocoa for less than what it is supposed to be sold for making loses in the process.
Cocoa has an increase in demand and this has become a problem because the cocoa produced does not meet the required demand.

Benefits of growing cocoa in Uganda

  • It provides employment opportunities to the people through labor and the farmer also earns big from the cocoa.

  • Cocoa helps health wise in controlling heart attacks in people.
  • Cocoa husks can b used as manure for gardens which improves the fertility of the soils.
  • Cocoa is also a form of food in form of chocolates which are eaten by everyone after processing it.

With the ever changing world and market all around, we all need to move with the changing world and cocoa is becoming a fast trending crop in the country. Therefore for those that want to earn a bit more and gain from the crop both through imports and exports, try growing cocoa and you will not regret it.

How to Harvest Cocoa

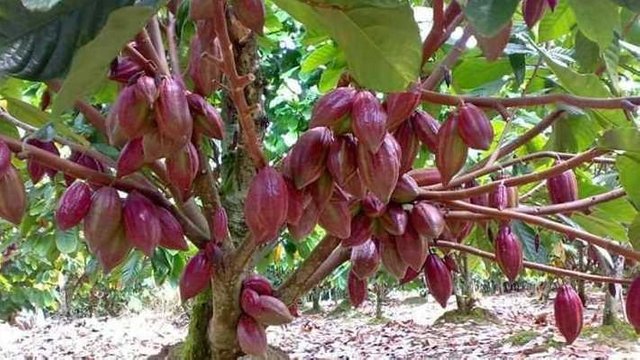
Harvesting Cocoa involves removing ripe pods from the tree, and opening them to extract the wet beans. 
Ripe pods assume a distinctive color and seeds rattle inside, green pods turn yellow and red pods turn orange. 
Make a clean cut through the stalk with a well sharpened blade to remove the cocoa seeds. 

PROCESSING COCOA BEANS

Opening the pods.
Do not wait more than 4 days to open the pods.
Open the pods by hitting them with a thick piece of wood.
Take the beans out of the pods and put them in baskets.
Then carry them to the place where they are to ferment.
Do not leave the broken husks on the field.
They can be used to make compost.
Why cocoa beans are fermented.
Longitudinal section of a cocoa plant
We have seen that the cocoa bean consists of a seed coat, a kernel and a germ.
Cocoa beans are fermented so as to destroy the seed coat, kill the germ and give the cocoa a good taste.
How to ferment the beans.
Good fermentation box
Often cocoa growers ferment the beans in heaps. They chose a flat and dry spot, cover it with banana leaves, make a heap of cocoa beans and cover the heap with banana leaves.
The beans ferment well if the heap is stirred from time to time.
It is much better to ferment the beans in boxes.
Use boxes with holes in the bottom.
Place these boxes on supports, for instance stones.
The juice runs off at the bottom of the boxes through the holes.
After two days, take the beans out of the box, stir them around well and put them into another box.
To make this work easier, you can stack the boxes one on top of the other.
Never leave the beans in the same box for more than two days.
Fermentation takes 6 to 10 days.
The beans are purple at the beginning, and turn reddish when they are fermented.


Drying cocoa beans
When the beans are well fermented, they must be dried.
Cocoa beans may be dried in the sun.
Spread the beans on boards raised 1 metre above ground level.
The layer of beans should not be very thick; not more than 4 centimetres.
Stir the beans often and protect them from rain.
To protect from rain, you can make a little shelter and slide the boards under the shelter every night and when it rains:
This is called a sliding tray drier.
Drying cocoa beans takes five to ten days.
In forest regions where the climate is very moist, cocoa beans do not dry at all well.
Badly dried beans are of poor quality.
You get less money for them.
In such regions several growers can get together and build a modern drier.
Spread the beans on a concrete slab set well above floor level.
Light a fire underneath, or allow hot air to pass through drums to heat the concrete slab.
Then the cocoa beans will dry better.
In this way one man alone can take care of drying the harvest of several growers.
He should not let the fire get too hot, to prevent the beans from becoming smoky.
He should stir them often so that they do not burn.
When the cocoa is quite dry, the beans are sorted.
  • Remove all the:
  • flat beans
  • germinated beans
  • mouldy beans
  • broken beans.
  • Keep only good beans.
  • Put these good beans into sacks.
  • Keep the sacks in a dry place well protected against animals.
  • Finally sell your sacks of cocoa.
 Good cocoa is one which has been
  • well harvested,
  • well fermented,
  • well dried.
Sliding tray drier
Quick Tips for growing cocoa in Africa


  1. Open up hole in arrow with a spacing of 3mx3m
  2. Harden off seedlings meant for planting, by gradually increasing light and reducing humidity. This takes 28days.
  3. Transfer the hardened off seedlings into the field, ensure to remove the polythen leaving the seedling with a ball of earth
  4. Put it in a hole and cover firmly with top soil first then subsoil.
  5. Water thinly and mulch to conserve the soil moisture. However a small space of 5-6cm around the seedlings base should be left clear to allow air circulation.
  6. Weed the plants basing on the intensity of the weeds
  7. Prune the tree leaving only one main stem to facilitate formation of a cone canopy.
  8. Apply sufficient fertilizers where necessary
  9. Harvest the pods when they ripen off


Tuesday, June 11, 2019

Makerere Private & District Quota Admission Lists 2019/2020 Is Out. Find it here


Makerere Private & District Quota Admission Lists 2019/202

The Main Administration Building, Makerere University, Kampala Uganda as seen from the Freedom Square.
The Office of Academic Registrar, Makerere University has released lists applicants admitted under the Private Direct Entry Scheme, Bachelor of Laws Private Day and Evening Programmes, District Quota under Government Sponsorship as well as Ugandan Students with foreign qualifications admitted on Private Admission for the Academic Year 2019/2020.
Also released are the Cut-Off Points for Private Students' Admissions for the Academic Year 2019/2020
NB: Candidates recommended for admission on District Quota under Government Sponsorship are pending verification by their respective districts.
Please see Downloads for detailed lists.

Monday, June 10, 2019

Feeding a banana plant. Know the kind of nutrient element banana need and how to get them

Our last article about the banana was a full guide to banana farming. Now we suppose you got the knowledge on how to got about it. And in case you missed it, you can find it by following this https://bsmr-consults.blogspot.com/2019/06/your-complete-guide-to-banana-growing.html


Today, we are going to have a look at how we can feed our banana plant to maximize the out put because we very well know that just like any other plant, bananas too need proper and balanced nutrients for them to grow vigorously and able to give good food. 
What To Feed Banana Plants – How To Fertilize A Banana Tree. 

Bananas used to be the sole province of commercial growers but today’s different varieties allow the home gardener to grow them as well. Bananas are heavy feeders in order to produce sweet fruit, so feeding banana plants is of primary importance, but the question is what to feed banana plants? What are banana fertilizer requirements and how do you fertilize a banana tree plant? Let’s learn more. What to Feed Banana Plants Like many other plants, banana fertilizer requirements include nitrogen, phosphorus, and potassium.
A well mulched banana plantation. Mulching is very important as it enhances water retention, maintains a micro environment in the plantation and additionally suppresses weed growth as it does control direct sun rays onto the soil. It's therefore advisable that you mulch your garden
 You may choose to use a balanced fertilizer on a regular basis that contains all of the micro and secondary nutrients the plant needs or divide feedings according to the plant’s growing needs. For example, apply high-nitrogen rich fertilizer once a month during the growing season and then cut back when the plant flowers. At this point, switch to a high phosphorus or high potassium food. Fertilizing a banana plant with additional nutrients is fairly rare. If you suspect any type of deficiency, take a soil sample and get it analyzed, then feed as necessary per results. How to Fertilize a Banana Tree Plant As mentioned, banana trees are heavy feeders so they need to be regularly fertilized to be productive. There are a couple of ways to feed the plant. When fertilizing a mature banana plant, use 1 ½ pounds of 8-10-10 per month; for dwarf indoor plants, use half that amount. Dig this amount in around the plant and allow it to dissolve each time the plant is watered. Or you can give the banana a lighter application of fertilizer each time it is watered. Mix the fertilizer with the water and apply as you irrigate. 

How often should you water/fertilize? When the soil dries out to about ½ inch, water and fertilize again. If you are choosing to use high nitrogen and high potassium fertilizers, the method is a bit different. Add the high nitrogen food to the soil once a month during the growing season at full dose according to the manufacturer’s directions. When the plant begins to flower, cut back on the high-nitrogen fertilizer and switch to one that is high in potassium. Stop fertilizing if the soil has a pH of 6.0 or under or when the plant begins to fruit.
Weeding is very important. Weeds tend to compete with the bananas for nutrients and the worst part is that weeds feed vigorously and aggressively than any crop or plant in the field. It is therefore recommended that you your field clean

Sunday, June 9, 2019

Your complete guide to vanilla farming in Uganda.Know how to grow it, where to sell it and to whom to sell to

Are you planning to start a vanilla growing business in Uganda or you're Vanilla importer, Cosmetics  Manufacture, Ice cream Maker, Chocolate Manufacture, or Bakery owner looking for a reliable Vanilla supplier/Exporter from Africa? 
Vanilla plantation in Uganda Africa. <br> You can see the spacing , the Intercroping & the shades
If this describes you and/or your situation , then relax..., pick up a cup of coffee.., a Vanilla flavored Cake... and  take your time to read through this Uganda Vanilla guide for some solutions! 
Top quality Uganda Vanilla Beans on a Blanket Curing from our 2018 Lot, the perfume is just irresistible
On this Uganda agribusiness guide you will find useful information that will help you qualify an investment case for your vanilla business in Africa. You will also learn basics on how to grow and process vanilla beans on a large scale. 
Sorting Uganda Vanilla Pods one Bean at a time. 
You can be sure the scent is real strong from the beautiful dark oily skin.
Sorting Uganda Vanilla Pods one Bean at a time. You can be sure the scent is real strong from the beautiful dark oily skin.
As a Vanilla Importer, you will be able to appreciate how organic vanilla in Uganda is grown and cured, and you will also be able to order/buy the right grade of vanilla beans for your clients.
Vanilla is a semi-terrestrial orchid, Vanilla fragrans syn. V. planifolia, a member of the ORCHIDACEAE family.
The sticks/beans of vanilla you buy in the shop are the pods, which have to be cured after harvesting.
According to Uganda history, pioneer farmers say that vanilla was introduced in Uganda during the colonial period by British farmers in Uganda as far back as the 1940s.
Salama Estate farm in Ntenjeru sub-county Mukono District was one of the three farms owned by British farmers where vanilla was grown.
In the late 1960s however, the British farmers experimented with an out-grower scheme involving a few farmers in the neighbouring Kooja parish as a strategy to increase production.
Kooja parish later became the pioneer and nucleus for vanilla production in Uganda, after the British farmers abandoned their farms and left the country due to unfavourable political conditions in the Adi Amin military regime.


On this Uganda Vanilla Guide you will find useful information and advice including videos on;
On this Uganda Vanilla guide you will be able to follow News Updates about the Vanilla industry and also  ask questions about growing and buying vanilla in Uganda.


So, should you plunge into the vanilla plantation business in Africa?

Before considering to grow vanilla on a large scale, your first question is to find out whether you will have market for your product. Take a look at the global Vanilla Market:
"Vanilla is the second most expensive spice in the world, after saffron, due to highly labor-intensive methods of cultivation.

It is also only grown in a few places, such as Madagascar, Uganda, Mexico, Indonesia and China. It requires a warm tropical climate, making it vulnerable to disease and natural disasters. All of this combines to make the global vanilla market one of the world’s most volatile.

World vanilla prices experienced a massive spike after a 2000 cyclone devastated much of the East Asia crop. The sudden drop in supply pushed vanilla prices to nearly $500 per kilogram and led to a rush of new market entrants hoping to take advantage of the now lucrative crop. Too many farmers had the same idea, however, and the market quickly swung back into oversupply. By 2010, prices had dropped to as low as $25 per kg and there was worry about market collapse as farmers could barely earn enough to get by.
Today, vanilla prices are surging upwards again due to drought, fungal attacks and low prices driving many producers out of the market. Export Grade Vanilla could now sell $240-$300 per kg, and there are concerns about hoarding and a lack of supply."
As of December 2016 Cured Vanilla Beans in Uganda were selling between USD240-USD350 per Kg and the beans were relatively scarce. A 2017 Global Vanilla Market report by a Major Vanilla Supplier Nielsen-Massey predicts prices to remain high at around USD400-USD450/Kg for this year. The prediction is based on studying the Madagascar vanilla industry, the Island which produces about 80% of the vanilla beans on the global market.
The 2017 global market outlook for Vanilla Beans was made even more volatile going forward when on 7 March Cyclone Enawo made landfall over Sava Region Madagascar destroying nearly 1/3rd of the Vanilla Crop and Displacing over Half a Million people.
An article by the Financial Times on 24th April 2017 revealed that Vanilla Pods were trading at an All Time High price of USD600 per Kilogram.
According to an article published in March 2018 by The Globe & Mail, Vanilla prices hit another historical high of USD700 per Kg mark.
As of June 2019, a kilo of vanilla beans still costs more than a kilo of silver at source. The price of black whole-bean Madagascar vanilla, the benchmark product, costs $520 per kilo. This article from REUTERS gives some detail.
In Uganda today, most Vanilla farmers are locked into long term vanilla supply contracts with European buyers and you can hardly find a farmer without market for his Vanilla; so if you have to buy without a contract then you're likely to pay more than what he earns from the long term buyer.
Uganda today produces some of the finest Vanilla on the World Market and as such some companies have even branded vanilla from Uganda as GOLD:
UGANDA GOLD TM - The New "Gold Standard" in Gourmet Bourbon Vanilla Beans.
These beans are quite simply the finest gourmet Bourbon-style beans we are now seeing in the market - surpassing even the finest Madagascar Bourbon beans we carry. In fact, an independent testing laboratory has reported significantly higher vanillin content in Uganda vanilla beans than any reading we have seen to date on Madagascar beans. Amadeus Vanilla Beans, Los Angeles, Califonia USA
The global vanilla industry outlook clearly shows that Uganda grown vanilla is poised to become a significant player on the World Market.
This translates into more vanilla being sold from your Uganda plantaion, exported just like Coffee or Tea to bring in substantial additional income to your farm...!
 Plan your vanilla plantation by Dividing the land and Creating shade

Vanilla plantation in Uganda . 

You can see the spacing , the Intercroping & the shades
First, divide up your farm land into 3 Equal proportions; then plan a to mange your large vanilla plantation using a three-year rotation strategy.You crop on one (1) acre say for two (2) years and rest that portion for one (1)year, thus your 3 acre area would be split up into three one-acre sections.
Vanilla requires top shade. This could be provided by Maesopsis eminii (RHAMNACEAE family) trees, known locally in Luganda as "Musizi". These are tall, fast-growing African trees with straight lobes and a spreading canopy of small leaves which cast a light dappled shade, ideal for vanilla.
You can raise these trees in soil blocks and planted out 6m apart each way. The Musizi can grow more than a meter in six months. The correct amount of shade is important.
Farmers in Uganda have found out that Vanilla does not do well when there is too much shade; this excess shade tends to weaken the vines.
Plan for Support Trees for your Vanilla vines in Uganda
A vigorous Vanilla Vine with Green Vanilla Beans supported by Jatropha Trees on a Uganda Vanilla Plantation in Africa.
A vigorous Vanilla Vine with Green Vanilla Beans supported by Jatropha Trees ( locally known as Biroowa) on a Uganda Vanilla Plantation.
To support the vanilla vines, you can grow Jatropha curcas (EUPHORBIACEAE) or Physic nut trees. The Vanilla roots attach themselves to the rough bark of these trees and draw nourishment from the organic matter and moisture in the bark.
The Physic nut is a low-growing tree and easy to keep in check by slashing unwanted growth to regulate the shade. Thus your Vanilla vines will have living supports instead of white ant-susceptible posts.
Each tree can support two vines, one on either side but not looped over into adjacent trees.
Plant your support trees at 3m x 1m spacing.
A combination of the "Musizi" and Physic nut trees could prove easy to manage in your large scale vanilla plantation in Uganda.
Banana plantations have also been used successfully to provide the right amount of shade when intercroped with vanilla.
 How to plant Vanilla in Uganda
Green Vanilla Beans Ready to Harvest in Uganda, Africa. We identify them by the pale skin and the yellowing on the tips.

Green Vanilla Beans Ready to Harvest in Uganda, Africa. We identify them by the pale skin and the yellowing on the tips.
Take two-six-node cuttings of mature vegetative vine - not from the vine which has flowered. Two cuttings, one on either side, are planted up against the support trees with the bottom two nodes under the mulch - not in the soil, otherwise they tend to rot.
Additionally, Care should be taken that the basal cut end of the cutting is kept just above the surface to prevent it from rotting.
If necessary, you can tie with a string to the support trees. Use a string which will rot, not plastic twine.
In parts of the Uganda where Vanilla and Cocoa are grown, known as the 'fertile crescent' around the top end of Lake Victoria; it rains just about every week. You will likely have no need for irrigating.
vanilla can be raised either as a monocrop or intercrop. It’s usually trained on trellis or on low branching, rough barked trees.
The trees have to be planted well in advance at a spacing of 1.2-1.5m within rows and 2.5-3.0 m between rows. Approximately 1600 to 2000 trees can be accommodated in hectare.
Shade should be provided initially to the vines by planting banana or other suitable plants as we mentioned ealier.
The vanilla plant should be allowed to trail horizontally on poles tied to trees after trailing to height of 1.5-2.0 m.
Flowering will not occur as long as the vines climb upward.
You should plant your cuttings at the onset of rains in very shallow pits, filled with humus and mulch.
After planting, your vanilla will need about three years to reach maturity.
 How to prun your Vanilla plants in Uganda
We found this Vanilla flower freshly Open while touring one Vanilla plantation in Uganda.

  Vanilla flower freshly Open when touring one 

Vanilla plantation in Uganda.
Shoots from the cutting will eventually grow up through the support trees and become pendulous. Flowers will form later from the axils of most leaves. The soft tips should be removed near ground level.
These can be taken to the nursery and rooted under shade in bags filled with fern fiber to supply your out-grower farmers for some additional income.
After the beans are harvested, the stem which has borne the pods should be cut back to allow a bud to grow near the support tree where there are plenty of aerial roots.
You should strive prune and pollinate your vanilla vines according to their vigor; DO NOT allow weaklings to bear fruit. Only vigorous, healthy vines should be brought into bearing, leaving only the amount of mature fruit wood that the vine is able to support.
Top quality Uganda Vanilla Beans on a Blanket Curing from our 2018 Lot, the perfume is just irresistible
When pruning, you must always think one year to 18 months ahead, at least under Uganda conditions. That is for the growth to form, flower, set and mature its pods.
 How to control weeds on your Vanilla Plantation in Africa
Only slashing of the grass should be carried out between the rows and the trash piled up against the bases of your vanilla vines. Vanilla roots, after having descended the support trees travel along the surface of the ground beneath the mulch and across the rows under the mat of grass. Where trash/mulch is lacking your can bring in alternative cover like bagasse from sugar mills.
Mulching must be thick enough to, hopefully, control all weeds; No need for Round up or other artificial herbicides.
You can also orient your according to the intensity of weeds in in your vanilla field.


How to pollinate your vanilla vines in Uganda

Vanilla starts flowering in the 3rd year of planting, however it depends on the size of the original cutting used for planting. Maximum flower production will be seen in the 7th and 8th year of a plant.
In Uganda, vanilla flowering typically occurs in March-June and September-October. Because vanilla has no suitable pollinating insects or birds, you will have to pollinate your vines by hand if you want to harvest any bean.
You need to be fast and efficient since vanilla flowers last for only a day.
On a large African vanilla plantation you may need to employ a skilled person for this job almost on full-time basis if you want excellent results.
Using a pointed stick, transfer the pollen masses onto the surface of the stigma in each flower.
You can pollinate 5-10 flowers per raceme according to the vigour of each vanilla vine.
After pollination, Vanilla pods could take about six months to form.
 How to Harvest and Process/Cure Vanilla in Uganda
Cured Uganda Vanilla Beans in Conditioning Box wrapped in Wax Paper. We have found Wax Paper a Better alternative to Aluminum Foil paper.
Cured Uganda Vanilla Beans in Conditioning Box wrapped in Wax Paper.  Wax Paper a Better alternative to Aluminum Foil paper.
Your vanilla pods will be ready for picking when the ends become slightly yellow.
After picking, the pods/beans dip in hot water at 65°C for two minutes; this process is done to kill any live tissues in the vanilla beans.
Let your heated beans drain, then lay the pods in lines on a cotton (not wool) blanket; research done in Uganda with different materials found cotton blankets to be the best.
The blanket is then folded over the pods and then rolled up. The rolls of blankets were placed on shelves in a dry, airy shed to allow the pods to sweat.
Unroll the blankets each day to expose the vanilla beans to the sun for a period of around half an hour. Repeat this until curing is finished.
The whole idea is to retain the juices in the pods and not to desiccate them.
Once cured, crystals of vanillin form on the outside of the pods which give off a pleasant vanilla odour.
After storage for about 3(three) months, you can pack your cured vanilla beans in tin boxes lined with silver paper and seal them off for export.
 How to sort and grade your vanilla according to bean length
We sort our Uganda Vanilla pods before shipping them to our clients. The Sorted Vanilla beans in the photo look a little drier and Less oily. Each Vanilla bundle has beans of the same length.
 Vanilla pods before shipping them to our clients. The Sorted Vanilla beans in the photo look a little drier and Less oily. Each Vanilla bundle has beans of the same length.
Size and appearance get the primary importance here, since; there is a direct relationship between the aroma (or vanillin content) and these factors. The beans are classified according to their length as follows:
  • 15 cm and above is grade I
  • 10-15 cm is grade II
  • 10 cm is grade III
  • Splits, cuts and damaged beans are grade IV
Top Grade 17-19cm Vanilla Bean in Uganda. <br>These long beans in our stock take the longest time to cure/dry but give the highest Vanillin Content. They don't easily mold & are heavy!
Top Grade 17-19cm Vanilla Bean in Uganda. 
These long beans in our stock take the longest time to cure/dry but give the highest Vanillin Content. They don't easily mold & are heavy!


How to grade your Vanilla according moiture;
Grade A and Grade B Vanilla Beans

This grading of vanilla is meant to cartegorise vanilla according to the moisture content and the possible end use of the vanilla beans.
Grade A Vanilla which is also known as the Gourmet Grade or Prime vanilla beans have a higher moisutre content and are normally used in cooking.The moisture content in Grade A vanilla is around 30% and these beans have plenty of caviar to scrape out. Grade A vanilla beans look very dark in color, pliable and moist.
Grade B vanilla is the Extract Grade ; these beans cured slightly differently and have a moisture content of around 20%. Grade B vanilla beens have a deep reddish-black coloration, and may have slight splits or cuts along the bean. They are very aromatic, but are noticeably drier than the other Grades.
 Quick Tips for growing and processing quality Vanilla in Uganda
Vacuum Packed Quality Uganda Vanilla Beans.<br> When Vanilla beans are stable after curing at 35% Moisture Content; <br>We prefer vacuum packing them on the day we put them on the Airline for Export.

Vacuum Packed Quality Uganda Vanilla Beans.

When Vanilla beans are stable after curing at 35% Moisture Content; 
We prefer vacuum packing them on the day we put them on the Airline for Export.
  • To get quality and sustainable yield, organic farming technique should to be adopted.
  • Get a cutting of at least 6 nodes; wrap it in a dump paper towel to keep it moist until you can plant it.
  • Spade up some little soil and add several handfuls of compost.
  • Remove the lowest two leaves from the cutting.
  • Insert the base of the cutting into the loose soil beneath the tree.
  • Then cover the two bottom nodes of the cutting with soil and pack it tightly around them.
  • Push a plant stake behind the orchid cutting and tie the cutting.
  • Water the plant to supply moisture (If in dry season). Be sure to mulch the soil around to conserve moisture.
  • Curing of green beans is to be commenced within a week of harvest, when they have rippened.
  • Matured, light green with tinge of yellow coloured beans are to be harvested individually, avoid broom harvesting.
  • For heat killing, temperature of water should not exceed 65-70 Degrees Centigrade.
  • Initial sweating is done for 24 to 48 hours. Extension of this period will initiate rotting.
  • Daily sun drying is to be followed by proper sweating for controlled fermentation.
  • Examine your Vanilla beans daily during sun drying and slow drying to avoid infection.
  • Molds, if noticed, has to be removed from time to time. Keep molded Vanilla beans away from the good Vanilla beans.
  • As in the previous steps, regularly check your vanilla Beans during conditioning to avoid any infection.


Super Grade Vanilla Beans from Uganda.<br> These are the Only Beans on the Global Market Rivaling the Bourbon Type Vanilla Beans from Madagascar.

Super Grade Vanilla Beans from Uganda.

These are the Only Beans on the Global Market Rivaling the Dominant Bourbon Type Vanilla Beans from Madagascar.

How to Buy Ugandan Vanilla Beans in Bulk

Often times we're approached by new Vanilla Buyers and flavor Enthusiast who want to by freshly Cured Vanilla Beans instantly;  but to the disappointment of some we say, there is no Cured Vanilla Beans for you at this time. 


Grade A Vanilla Beans 
Now Available in Bulk
                                                                     
Uganda Gourmet Grade Vanilla Beans from Our 2018 Vanilla Curing Lot in my hand just before we Vacuum Packed them for further conditioning.
So, then how can you buy Ugandan Vanilla Beans in Bulk?  
The answer comes from appreciating the fact that green Ugandan Vanilla Beans are harvested mainly in two seasons of the year. 
Grade A Vanilla Beans of Flat Surface in Uganda. This is the front view of these two Bundles just before we Packed them for export.
Grade A Vanilla Beans of Flat Surface in Uganda. This is the front view of these two Bundles just before they are Packed for export.

To buy Vanilla Beans in Bulk from us therefore, you will need to make a confirmed Order before each vanilla harvest season such that when we're preparing to cure the green vanilla beans for a particular season your beans are included.
Gourmet Vanilla Beans in Uganda

 These Grade A Vanilla pods are sometimes what we call Super Grade locally. You can see that irresistible dark oily skin. 

Sorry you missed the strong Vanillin Scent..! But I got you covered, its real!!

Popular Posts